Dining Room Farmhouse Light
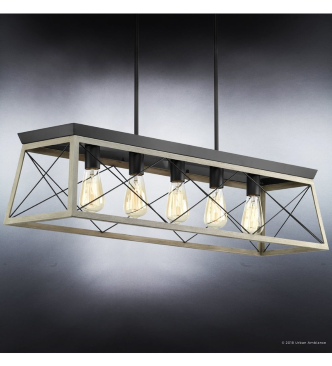
I knew that I wanted a long rectangle shaped light fixture for the dining room since we had the large rectangle table. The problem was, all the light fixtures I was seeing online were in the $250-$400 price range and none of them had as many lights as I wanted. Soooo, I happened to see a set of vanity lights listed for sale, cheap, on FB Marketplace, and it got me thinking that I could MAKE a light for the dining room! I wanted a simple farmhouse look, and it didn’t seem like it would be that hard to do.
First, to be clear, my husband knows electrical, so, if you don’t know your way around wiring, please make sure you find an electrician if you plan to take on this project!
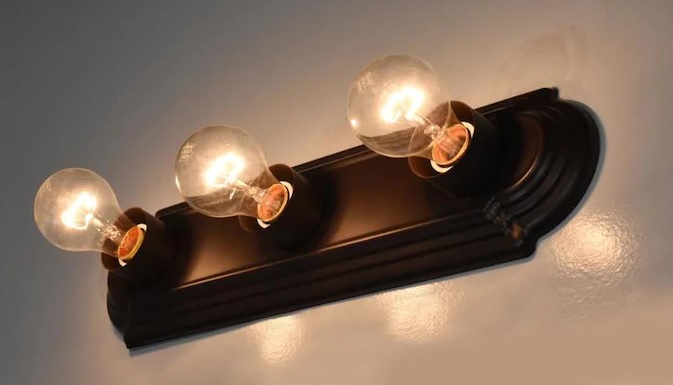
So, as I said I found a vanity fixture posted on marketplace, two actually, that were the simple plain dark bronze fixtures. The upside for these was not only that they were cheap, they had the round sleeves around the sockets that I wanted. Now, we did check on all the hardware to make the light, but to buy the individual sockets and sleeves and lamp kit was going to make it more worth it to buy the new light. So, I thought why not get these, take them apart and see if we can make it work. If it didn’t, not much spent, but, if it did, we would have a new light for around $60 (not counting the bulbs which we would’ve had to purchase separately with a new fixture as well).
I was able to get the two fixtures from someone on FB Marketplace for $15 for the set. They each had 3 lights, so our fixture would have 6 lights total.
Next, we purchased ¾ x ¾ trim for the sides and bottom. We already had some scrap 1×8, so we used that for the top. We also purchased 2 pieces of crown molding for the top (they were on clearance, so bonus at under $8 each!!).
I wanted a large light, so we went with a 36 inch length and the width of the existing 1×8. There are no rules when you’re making it yourself! So, the final light would be 36 inches x 7.5 inches.
First, I had to take apart the vanity lights. I popped out the back plate, then, using metal cutters, being careful not to clip any wires or damage the bronze sleeves, I began cutting the front plate (the part you see when it’s actually hanging on the wall). In my case, there was a small metal piece attached to the socket that was clipped in, so I left that intact to use as the way to secure the sockets to the fixture so they would stay in place.
Then, I measured the length of the board and from the center point of the sockets, I marked off where the holes needed to be and used a door hole bit on the drill to make the holes for the sockets to ‘drop thru’.
Once these were cut, I measured out my ¾ trim boards and cut them with a chop saw. For the design I wanted, I cut pieces to line the underside of the top, leaving space for the 4 pieces coming down at the ends, then measured and cut the matching ‘box’ of ¾ trim for the bottom of the light. I knew I wanted to use the Edison bulbs, so I did not leave any space for globes, so if you plan on adding globes, make sure to account for the additional space coming down. I cut the pieces coming down at 7 inches, so the final height from the bottom of the light to the crown molding is 7 ¾ inches.
Lastly, we cut the crown molding for the top. The bottom of the crown was attached to the 1×8, this way, the top part of the molding concealed the wiring and hooks for the chain.
We also had to make a top plate for the ceiling. We again used a scrap of wood we had in the garage and some small trim to give it a decorative finish around the edges. I did leave this just stained and added a coat of poly rather than the chalk paint since it would be against a white ceiling.
Once this was all lined up, I decided to assemble all the wooden parts of the light first so it could be stained/painted before installing the sockets, sleeves and electrical components. I started by staining the entire fixture in a dark walnut stain. Luckily, we had purchased the quart of stain when we refinished the table and have since used the same stain on the buffet, some of the floor trim and still have plenty left so all the projects will match. Be sure to get a good coat of stain around the inside of the holes you drill where the light sleeves will come thru so you don’t look up from your table and see bare wood.

I couldn’t decide how much I wanted painted and how much I wanted stained, but the more I thought about it, since the room itself is a dark color (navy), I went with the majority painted on the outside, then left the interior dark. I just used the same white chalk paint I’ve used on other projects. This took a few coats to get the color I wanted, then I sanded and distressed in several places.

Since this part was complete, we then needed to actually install the sockets. We attached two small boards to the upper part of the light (the part hidden by the crown molding) on either side of the holes to attach the sockets to that were about a half inch thick. Attaching them directly to the board allowed too much of the socket to show from the underside, so raising them just a little was all we needed.
Next, came actually installing the sockets. This part takes a lot of checking and double checking. Since we basically had 6 individual sockets (3 each attached only by the wire between them), we had to place them, then check for center a few times on each one. We were able to use small metal screws to attach the previously clipped in bracket to the small board.
I left the actual connection of the wiring to my husband. He connected the two sets of 3, then wired that together with the light kit we purchased at Lowes for under $20. The kit included two hooks, chain and a cord. He did cut the plug end off of the cord since we were hardwiring it in and were not using a plug.
And, since we were using two chains, we had to find two additional hooks, which we had. We used the brown ones that came in the kit for the top plate since those would be seen, and the ones we had in the garage on the top of the light since those were hidden by the crown molding.
After this was complete, I wanted the ‘wire crisscross fence’ look around the sides, so I purchased a roll of 16 gauge tie wire (used for concrete). It was lightweight, easily cut with small wire cutters and flexible enough to bend out flat without showing a lot of bends/breaks in the wire. I started by measuring out the length of the wood box underneath, divided by 7. This gives you 6 diagonal wires from top to bottom and 6 from bottom to top when you start in the corners. I marked the hashes lightly with a pencil and went to work on creating the crisscross grid. As I unrolled the wire, I did take a paper towel to it since it’s got a coat of oil on it. I measured from one hash mark on the top to one on the bottom diagonally to come up with the measurement of the wire pieces. For my light, they needed to be 9 inches. I then cut 28 pieces, straightening as I went, to make sure they were all as straight as possible and ready to install.
Now, since I ‘weld’ better with a glue gun than I do with actual metal…. That was my method for installing the wire. Starting in the corner and lining up with the hash marks, I worked my way around. Remember that except for the corners, you will have two wires coming together at your hash mark, so split the difference if you need to when gluing your pieces flush to the light (meaning they shouldn’t overlap, they should all be flat on the wood). Also, keep in mind, that if you use hot glue, you HAVE to use LED lights so they don’t get hot (not that I think a regular bulb would get hot enough to melt hot glue, but my husband was worried about it, so we went with LED lights). An alternative, and my first thought at this was to use a staple gun to attach the wire, but in the end, I thought the glue gun would be the simplest and fastest method. I thought if it looked too rough, I could come back and attach a thin piece of wood over the glued portion, but honestly, you don’t notice it unless you’re looking for it and get pretty close to the bottom of the light.
The only thing left was actually hanging it in place. We have pretty high ceilings, so we were able to cut the chain at 21 inches (we actually cut it a little longer so we could play with the length, but 21 inches was the final length we agreed on). This put the bottom of the light at 31 inches from the ceiling. We attached the two brown hooks to the ceiling plate, then, drilled a hole thru near one of the hooks for the wire to be fed thru to the ceiling box. Again, make sure you consult or use an electrician for wire connections/installations. We fed the wire up the chain, thru the hole and attached the plate using hollow wall anchors on the opposite side of the hooks (came with the package).
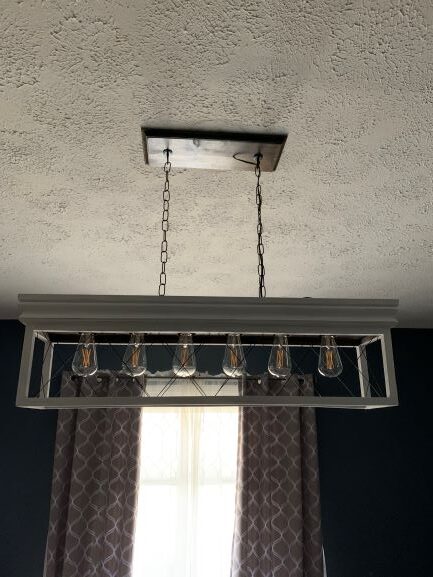
I love how it turned out! It’s not exactly like the ‘inspiration’ picture, but I think I like this one better! Now, I just need to get up there and touch up the ceiling where the previous round light had been.
Looks great!